

Best Workflow of Mavic Pro 4K with FCP X
Category : Hot Topics
The DJI Mavic Pro camera shoots up to 4096×2160 4K video at 30 frames per second. For Final Cut Pro X users, when the shooting is completed, you may come the need to import the Mavic Pro 4K video into FCP X for some post editing workflow. The following article will show you the workflow of Mavic Pro 4K video with Final Cut Pro X on both powerful or slow Mac computer.
Detailed video format pecification of DJI Mavic Pro
Before going any further, first take a look at the 4K format specification of DJI Mavic Pro listed below:
Container format: MOV
Compress Codec: MPEG-4 AVC/H.264
Video Resolution and frame rate: DCI 4K (4096 x 2160): 24p/UHD 4K (3840 x 2160): 24/25/30p
Video bit rate: 60Mbps
Workflow of DJI Mavic Pro 4K with FCP 7/X on powerful Mac computer
If you Mac computer is powerful enough to handle 4K resolution very well, then you can directly load the 4K H.264 video recorded by DJI Mavic Pro to FCP X since FCP X has included native importing support for H.264 files. However, since H.264 is mainly used as a delivery file format but it is not an ideal editing format, when you try to directly edit H.264 with FCP X, you will start to lose image quality as you do color correction or composite gradients to create greenscreen keys. There just isn’t a lot of room to work.
Transcode Mavic Pro 4K H.264 to Prores for FCP X best editing workflow
To solve the editing issues caused by H.264, it would be much better to transcode H.264 to FCP X’s high performance and high quality editing codec Prores, which render faster and have more room, so you can create great looking effects without losing any quality.
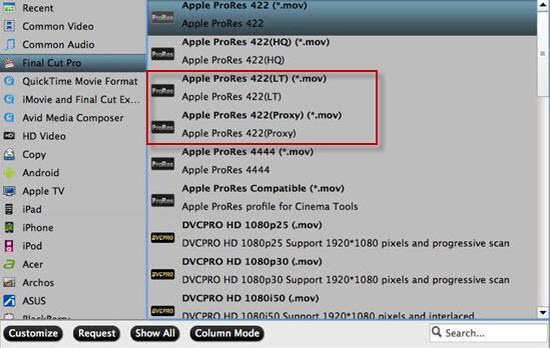
Here, you can get the job easily done with Pavtube iMedia Converter for Mac. The program can assist you to swiftly convert Mavic Pro 4K H.264 to FCP X most favorable editing codec Apple Prores in various different file types including Apple Prores 422, Apple Prores 422 HQ, Apple Prores 422 Proxy and Apple Prores 422 LT. If you Mac computer are powerful enough to handle multicam and high-resolution video and you are going to do many effects editing work with FCP X, you’d better choose to output “Apple Prores 422(*.mov)”or “Apple Prores 422(HQ)(*.mov)” for better performance. However, if your Mac computer is old or slow, or you just want to do some rough editing, you can select to output “Apple Prores Proxy)(*.mov)”or “Apple Prores (LT)(*.mov)” format to save more space and bandwidth.
Pavtube iMedia Converter for Mac is pretty simple to use, no matter experienced user or fresh could handle it very well. In addition, it keeps constant update with perfect support for the new Mac OS X El Capitan and macOS Sierra 10.12. What’s more, the results produced by the program are pretty high quality, you can’t tell the difference between the converted video and the original 4K video.


How to Convert Mavic Pro 4K H.264 to Apple Prores for FCP X Best Editing Workflow?
Step 1: Transfer DJI Mavic Pro 4K video to Mac computer.
The DJI Mavic Pro 4K records footage on an SD card, you can remove the SD card from the camera, insert the SD card to a card reader, then plug in the card reader into your Mac computer SD card Port for transferring the video footage to your Mac local hard drive.
Step 2: Import DJI Mavic Pro 4K videos.
From “File”drop-down option, select “add Video/Audio”to add source DJI Mavic Pro 4K video files to the program.

Step 3: Select output file format.
From “Format”bar drop-down list, select your desired Prores format types according to your own needs. If your Mac computer is powerful enough to handle 4K video, it would be ideal for you to choose “Apple Prores 422(*.mov)” or “”Apple Prores 422(HQ)(*.mov)”for high quality performance on FCP X.

If you have a slow Mac computer, it is ideal for you to output “Apple Prores 422(Proxy)(*.mov)” or “Apple Prores 422(LT)(*.mov)” format.
Step 4: Start the conversion process.
After all the settings is over, go back to the main interface and hit right-bottom “Convert” button to start to convert Mavic Pro 4K H.264 video to FCP X best favorable editing format Apple Prores codec.
When the conversion is completed, launch Final Cut Pro on your Mac computer to import converted video to FCP for smooth editing workflow on either powerful or slow Mac computer.
Workflow of DJI Mavic Pro 4K with FCP X on slow Mac computer
If your Mac computer is not powerful enough, you can either use the program – Pavtube iMedia Converter for Mac listed above to create Proxy files such as Apple Prores 422 Proxy or Apple Prores 422 LT or directly with Final Cut Pro X by following the steps below:
There are multiple ways to create Proxy media in Final Cut Pro X: You can do so upon initial media import, or you can do so after media is imported.
On the media import screen, you’ll see an option under the Transcoding section to create proxy media. Ensure that this option is checked to convert all imported videos to proxy media right after import.

The second way to create proxy media can be employed after media is imported. Simply right-click on the media that you wish to convert to proxy media, select Transcode Media and check the box next to Create proxy media


