

How to use Lumix GH4R 4K video in Adobe After Effects
Category : 4K Cameras , 4K Formats , Adobe Premiere
Panasonic Lumix DMC-GH4R is an extremely slight update on the award-winning DMC-GH4 which boasts unlimited 4K recording and V-Log L video capability for better post production potential. GH4R can record unlimited 4096 x 2160 24 fps (frames per second) cinema-like footage, or QFHD 4K 3840 x 2160 at up to 30 fps, and is only restricted by your memory card. Well, then you may seek for a tutorial for the post workflow when dealing with Lumix GH4R footage just like me. In this tutorial, I will share a guide on how to import Panasonic Lumix GH4R 4K to After Effects for further editing.

4K footage looks amazing but usually it can make video editing a real nightmare. You will find it a painful experience when editing Lumix DMC-GH4R 4K footage in After Effects (including CC/CS6/CS5). Your computer freezes when editing the 4K video. Yeah, After Effects supports 4K video, but it really needs something with more CPU power with the 4K media. What’s more, some 4K footage like 4K MP4/MOV are beyond the format compatibility of After Effects. So, what’s the fluid workflow for editing Panasonic Lumix GH4R 4K in After Effects on Mac OS X El Capitan smoothly?
If you need to edit Lumix DMC-GH4R 4K videos in Adobe After Effects, you need to convert raw 4K video files to Adobe After Effects supported AVI, MOV, MPEG and FLV etc. Here, iFastime Video Converter Ultimate for Mac can help you do the job. (Read review)
With it, you can create an Adobe After Effects friendly file format- MPEG-2 keeping the original quality in OS X El Capitan, Yosemite, Mavericks, Mountain Lion and more. And Mac mini, Mac Pro, 4K iMac, 5K iMac, MacBook Pro, MacBook, MacBook Air are all supported. Besides AE, this software can also export professional encoders like DNxHD for Avid Media Composer, ProRes for Final Cut Pro, AIC MOV for iMovie, MPEG-2 for Premiere Pro and more. For Windows users, 4K Video Converter is the alternative choice.
Free Download or Purchase iFastime Video Converter Ultimate for Mac:


Other Download:
- Cnet Download: http://download.cnet.com/iFastime-Video-Converter-Ultimate/3000-2194_4-76448683.html
- Top 4 Download: http://www.top4download.com/ifastime-video-converter-ultimate-for-mac/hekvsosm.html
- WinSite Download: http://www.winsite.com/Multimedia/Video/IFastime-Video-Converter-Ultimate-for-Mac/
- Softonic Download: http://ifastime-video-converter-ultimate-for-mac.en.softonic.com/mac
Have issues when installing the app on Mac OS X El Capitan? Read the solution here.
Simple Guide : Convert and Import Panasonic Lumix GH4R 4K to After Effects
Step 1. Install the Mac 4K Converter program and run it. Drag the 4K .mov or .mp4 files from Lumix GH4R to the software. Or you can also click “Add video” button on the top of the main interface to import video to the program. You also can imput several files one by one which will be listed in the box together.
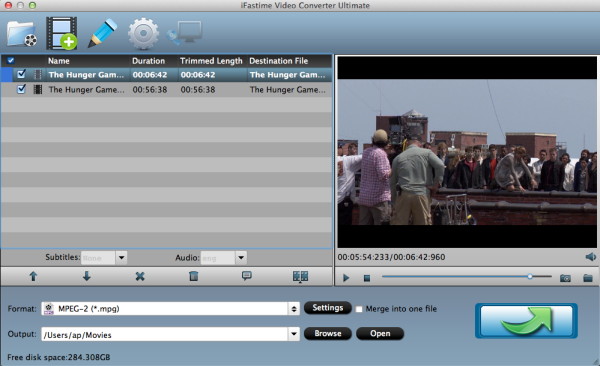
Tip: If you wanna combine several video clips into one file, you can click the “Merge into one file” box.
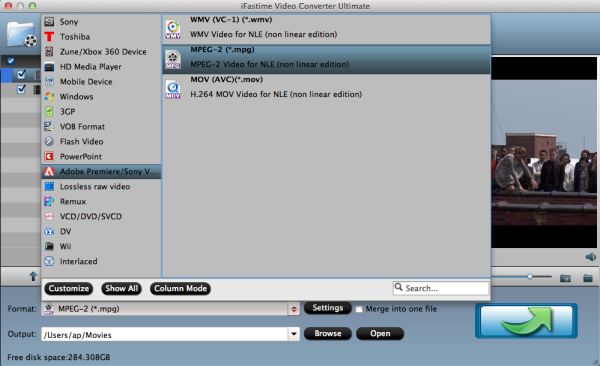
Step 2. Choose MPEG-2 as output format
This 4K to After Effects converter offers optimized format preset for After Effects. Just click “Format” menu firstly and then follow “Adobe Premiere/Sony Vegas” to set “MPEG-2 (*.mpg)” format.
Step 3. Adjust video, audio settings
Click the “Settings” button and customize proper video/audio parameters including Video size, bitrate and fame rate and mroe.
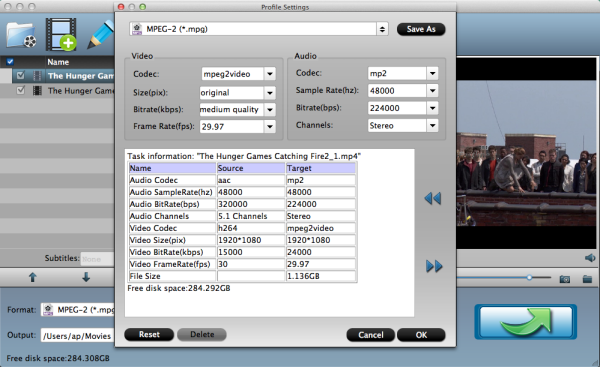
Note: If you want to get original 4K resolution, just keep the video size as original or you can downscale 4K to 1080p for easier editing.
Step 4. Start conversion
After all necessary settings, hit “Start conversion” button to start Panasonic Lumix GH4R 4K video to AE conversion on Mac OS X El Capitan. Once the conversion process shows in 100%, click Open to get the output videos. Create a project and start editing Panasonic Lumix GH4R 4K MP4/MOV videos in After Effects (including CC/CS6/CS5) with light speed.
How to load converted videos to After Effects?
1. Go to the “File Menu” at the top of your workspace. Then go to “File” and “Import File.” Here you will need to search for your video or animation footage. Select it with your mouse and click “OK.”
2. When your files are imported, they will appear as a list in your Project Panel. Each file that you imported will appear with its name and file extension to the right of the footage type icon. Your Composition will also appear in the Project Panel, either under the name you gave it or “Comp 1” if you did not name it.
You can also add footage to your Project using Windows Explorer. For example, if your files are saved in “My Documents,” you can locate your file there–click on it with your mouse, then drag it directly to the Project Panel.
Now get started familizaring yourself with the After Effects workflow by watching this free video guide below:
Have more questions about how to use Lumix GH4R 4K video in Adobe After Effects, please feel free to contact us>> or leave a message at Facebook.


