

Work 4K Video with Camtasia Studio
Category : 4K Editor , 4K Formats
Computer requirements to edit 4K video with Camtasia Studio
Editing 4K video with Camtasia Studio requires a large amount of computer power, to get the best 4K video editing experience, make sure that your computer meet the following specifications:
Processor: Intel(R) Core(TM) i7-4770 CPU @ 3.40GHz (8 CPUs), ~3.4GHz
Memory: 16GB RAM
Graphics: NVIDIA GeForce GTX 745
– Display Memory: 12197 MB
– Dedicated Memory: 4035 MB
– Shared Memory: 8161 MB
Additional tips to get the best 4K editing experience with Camtasia Studio
1. Edit on a 4K monitor to reduce any scaling that would occur on a smaller monitor
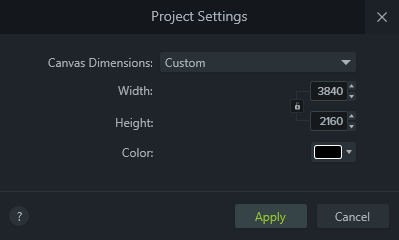
2. Select File > Project Settings > Custome. Make sure your Project Settings are set to 3840×2160
3. Keep the source content on a local hard drive or a SSD drive
Edit 4K video with Camtasia Studio on lower powered computer
Although Camtasia doesn’t prevent your from editing 4K content. However, on lower powered machines, the playback performance could appear choppy and you may experience program slowness while editing.
Therefore, it would be essential for you to compress 4K to 1080p to get a smooth editing experience of 4K video with Camtasia Studio on slow computer
Load unsupported 4K video to Camtasia Studio
Sometimes, even if your computer meet the system requirements to work with 4K content, you may still fail to import the 4K video to Camtasia Studio if the 4K video are not included in Camtasia Studio supported file formats listed below:
|
Platform |
Video Formats |
Audio Formats |
|
Camtasia Editor for Windows |
.AVI |
.MP3 |
|
Camtasia Editor for Mac |
.MOV (QuickTime movie) |
.AIFF |
From above tablets, we can see that the supported importing 4K file formats by Camtasia Studio are very limited, you will be unable to load various 4K file types such as 4K MXF, 4K XAVC/XAVC S, 4K Prores, 4K H.265, etc into Camtasia Studio. To fix the format or codec incompatible issue, you will need to perform a transcoding process.
Best 4K Video Converter for Camtasia Studio editing
If you are looking for a one-stop solution to fix all Camtasia Studio 4K video editing issue, we highly recommend our best 4K Video Converter – Pavtube Video Converter (get Mac version) to you. The program has perfect loading support for all the unsupported 4K video listed above, thanks for its batch conversion mode, you can load multiple 4K video into the application for conversion at one time to save your precious time.
With this powerful yet simple to use application, you can not only transcode unsupported 4K video to Camtasia Studio supported 4K file formats such as 4K AVI, 4K WMV, 4K MP4, 4K MOV listed above, but also compress 4K to 1080p if your computer doesn’t meet the system requirements to work with 4K video content.
Edit 4K video with built-in editing options
Before loading the 4K video into Camtasia Studio, you can do some basic 4K video editing work with the beneficial editing functions offered by the program. You can trim or cut off 4K video to remove unwanted parts from the beginning or end, crop 4K video to get off the black bars or size area, merge separate 4K video into one file, split large 4K video into smaller by file size, count or length, etc.


Step by Step to Convert and Compress 4K Video for Camtasia Studio Editing
Step 1: Load unsupported 4K video.
Download the free trial version of the program. Launch it on your computer. Click “File” menu and select “Add Video/Audio” or click the “Add Video” button on the top tool bar to import source 4K video files into the program.

Step 2:Define the output format.
Clicking the Format bar, from its drop-down list, select one of Camtasia Studio supported editing file formats.
If your computer are meet the system requirements to edit 4K video, you can choose to output Camtasia workable 4K file formats “H.264 High Profile Video(*.mp4)” under “Common Video” main category.

If your computer are under powered machine that lacks the ability to handle 4K resolution video, then it would be essential for you to downscale 4K to 1080p by outputting one of Camtasia Studio supported HD editing file formats such as “H.264 HD Video(*.mp4)” under “HD Video” main category.

Step 3: Edit 4K video with built-in editing options.
By default the Edit icon is grayed out, you have to Select an item first to activate the Edit menu. When a video or movie is selected, click the pencil like Edit icon on the left top tool bar to open the video editor window, here, you can play and preview the original video and output effects. Also you can trim video length, crop video file size, merge separate video, split large video into smaller, etc.

Step 4: Begin the conversion process.
After all setting is completed, hit the “Convert” button at the right bottom of the main interface to begin 4K video to Camtasia Studio supported 4K video or 1080p video editing format conversion or compression process.
When the conversion is finished, click “Open Output Folder” icon on the main interface to open the folder with generated files. Then you will have no problems to import 4K video to Camtasia Studio for creating amazing video.


