

Best Way to Compress 4K to 1080p
Category : 4K Formats
Why compress 4K to 1080p?
4K video are superior to 1080p video with up to 4 times pixels. Therefore, you can usually get clear pictures with more details when shot video at 4K resolution. However, at the same time, when you try to play, edit or share 4K video online, you may find that 4K video is not that compatible and accessible when compared with 1080p video. The main reason is that the compression codec such as H.265 used by 4K video are not recognized by most hardware or software. While the H.264 compression codec adopted by most HD video has perfect compatibility with most devices, applications and also online services. Another important reason why we choose to downscale 4K to 1080p is that 4K video is too large in file size, 1 minute of 4K video takes up 350MB, if you are unwilling to let the 4K video eat up all the storage space on your computer hard drive or phone internal memory, then it is essential for you to reduce 4K video to 1080p.
How to compress 4K to 1080p?
It would be a little tricky when downscaling 4K to 1080p with good quality. There are many factors such as file format, resolution, codec, bit rate, frame rate, etc will influence the final output file quality. The following article will show you how to compress 4K with best quality with our splendid 4K video compressor – Pavtube Video Converter.
1. Reduce file resolution from 4K to 1080p
The 4K video is very large in size, you can get a small file by adjust the output file resolution from 4K to 1080p, 720p or other small file resolution in the program’s “Profile Settings” window. The smaller file size video will save a lot of space for your computer hard drive or device internal memory.
Related article: Compress Mavic Pro 4K to 1080p | Downscale Phantom 4K to 1080p
2. Compress 4K to 1080p with H.265 codec
Although most HD video used the widely accepted H.264 codec, however, the new compression standard H.265 codec offers roughly double the compression ratio for the same quality video than H.264 codec. It also means that when a HD file is encoded with H.265, it will only occupy half the space of its H.264 equivalent with no noticeable change in quality, or the same amount of space with improved quality.
3. Lower video bit rate or frame rate.
Another efficiently way to reduce 4K file size is to lower the file bit rate or frame rate. But always keep in mind that the video quality will be bad in case you make the bit rate too low, in addition, reducing the frame rate may affect the smoothness of the playback. Acceptable frame rates vary depending on the specific video clip. You may have to experiment to find the lowest acceptable value.
For Mac users, please switch to download Pavtube Video Converter for Mac to do the 4K to 1080p video compression on macOS High Sierra, macOS Sierra, Mac OS X El Capitan, Mac OS X Yosemite, Mac OS X Mavericks, etc.


Step by Step to Compress 4K to 1080p with Best Quality
Step 1: Load 4K video.
Download the free trial version of the program. Launch it on your computer. Click “File” menu and select “Add Video/Audio” or click the “Add Video” button on the top tool bar to import source video files into the program.

Step 2: Choose output file format.
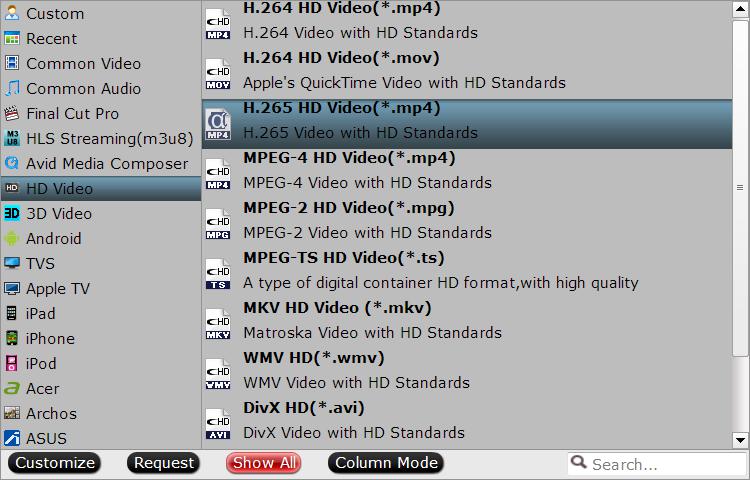
Clicking the Format bar, from its drop-down list, here, you can choose to compress 4K to 1080p to a more compatible HD file format such as “H.264 HD Video(*.mp4)” under “HD Video” main category.

If you wish to get a smaller file with better quality, we highly recommend to choose “H.265 HD Video(*.mp4)” under “HD Video” main category.
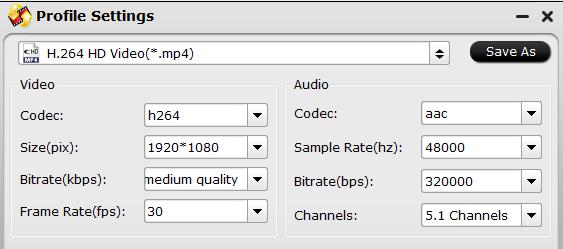
Step 3: Adjust output file resolution, bit rate or frame rate.
Click “Settings”, on the main interface to open “Profile Settings” window, from “Size(pix)” drop-down list, choose “1980*1020” or “1080*720” or other smaller file resolution according to you own needs. From “Bit rate” and “Frame rate” drop-down window, choose a acceptable smaller value to keep a good balance between file size and quality.
Step 4: Begin the conversion process.
After all setting is completed, hit the “Convert” button at the right bottom of the main interface to begin 4K video to 1080p compression process.
When the conversion is finished, click “Open Output Folder” icon on the main interface to open the folder with generated files. Then you can get a smaller compatible file for better playing, editing, sharing.


