Handrake H.265/HEVC Encoding on Mac
Category : Hot Topics
H.265, also referred to as High Efficiency Video Coding (HEVC) is a new video compression standard which achieves double the data compression of H.264/MPEG-4 AVC and, best of all, preserves the best video quality. It supports 8K UHD and resolutions up to 8192×4320. There are a whole collection of tools and utilities that can encode H.265/HEVC, but in this article we will focus on how to encode H.265/HEVC on Mac with Handbrake for Mac.
Guide to encode H.265/HEVC with Handbrake on Mac
Tips: To encode H.265/HEVC with Handbrake on Mac, make sure to download Handbrake 1.0.0 or later version as it has added support of H.265/HEVC encoding. Then follow the guide below to create high quality and small file size H.265/HEVC video on macOS Sierra.
Step 1: Free download, install and run Handbrake on Mac. Load the file to be encoded to H.265/HEVC by clicking “Source” > “File” button on the top left side. Or you can tap the Folder button to batch convert multiple files at a time. It will take a few minutes to scan the title.
Step 2: Click the Browse button to specify a destination folder on your local Mac to save the encoded files.
Step 3: Choose output file container format and codec.
Click the “Video” tab, change the video codec from H.264 to H.265 (x265). Also make sure to change the container from MP4 to MKV so that you can embed subtitles if you want to.
Step 4: Tweak the settings. Generally, please leave the settings unchanged.
4.1) Go the Filters tab and set the Interlace Detection to Fast so as to only deinterlace frames are interlaced visibly.
4.2) Set the Denoise to hqdn3d with a custom preset of 1:1:4:4 to get rid of noise or grain from the video.
4.3) Leave Use Advanced Tab instead setting unchanged -> set Encoder Preset and move the slider bar from Fast to Medium as it keeps good balance between H.265 encoding time and file size. Faster setting will result in a larger file and vice versa.
4.4) Change the Constant Quality value to 23 for HD 1080p videos and 22 for HD 720p videos. Generally, the smaller the RF value is, the better quality and higher bitrates are, and vice versa. Please don’t go any lower than 30 or higher than 15 in order to get good quality with acceptable size.
4.5) Leave the audio codec unchanged in the Audio tab -> change the bitrate to 256 for good quality and Mixdown to 5.1 Channels.
4.6) Add tracks, import SRT as the external subtitles, codes the text into the video stream, display subtitles especially when the dialogue is in foreign language, etc.
Best Handbrake alternative to encode H.265/HEVC on Mac
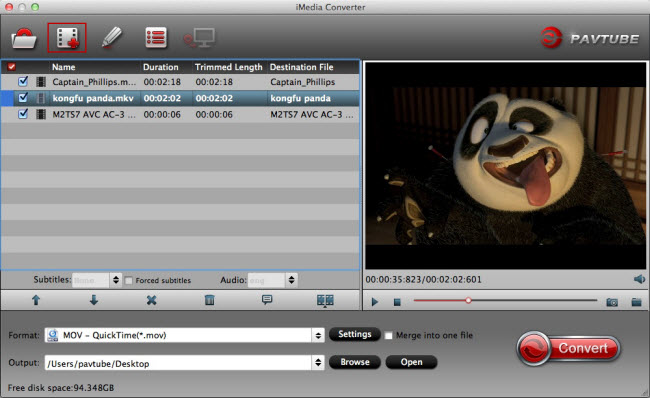
Although Handbrake now includes H.265 encoding on Mac, however, a lot of people complain that they fail to run the H.265 MKV or MP4 files on Mac by using neither VLC or QuickTime 7 with perian. Those problems reflects that Handbrake encoding H.265/HEVC is still not mature yet. If you are looking for a more powerful and reliable program to encode H.265/HEVC on Mac, we highly recommended Pavtube iMedia Converter for Mac to you. The program can comprehensively encode 2D/3D Blu-ray disc/BDMV folder/ISO image file, DVD Disc/Video_TS folder/IFO/ISO image file to both H.265 MP4 and MOV file format with the resolution of 4K or 1080p resolution. Unlike Handbrake which features a unapproachable interface, the program is pretty simple to use. You can complete the whole conversion with just few clicks: import files, choose H.265 output file format, hit convert button.
For advanced users, you can flexibly adjust output profile parameters such as video codec, resolution, bit rate, frame rate, audio codec, bit rate, sample rate, channels, etc as you like to get better output video and audio quality.
Pavtube iMedia Converter for Mac has perfect compatibility with the new macOS Sierra, in addition, it is also accompanied by an up-to-date Windows version – Pavtube Video Converter Ultimate for you to encode H.265/HEVC using GPU acceleration on Windows 10/8.1/8/7. The program is quite safe and clean since it doesn’t feature any ads or bundled adware. What’s more, the results produced by the program are pretty high quality, you can’t tell the difference between the ripped video and the original video.
How to Encode H.265/HEVC on Mac with Pavtube iMedia Converter for Mac?
Step 1: Input Blu-ray/DVD or digital video.
Start the application on your Mac computer. For loading digital video, click “File” > “Add Video/Audio” or “Add from folder” (batch load multiple files) option. For loading Blu-ray or DVD disc, Insert your Blu-ray or DVD disc into your computer’s optical drive , hit “File” > “Load from disc” option.

Step 2: Output H.265 video.
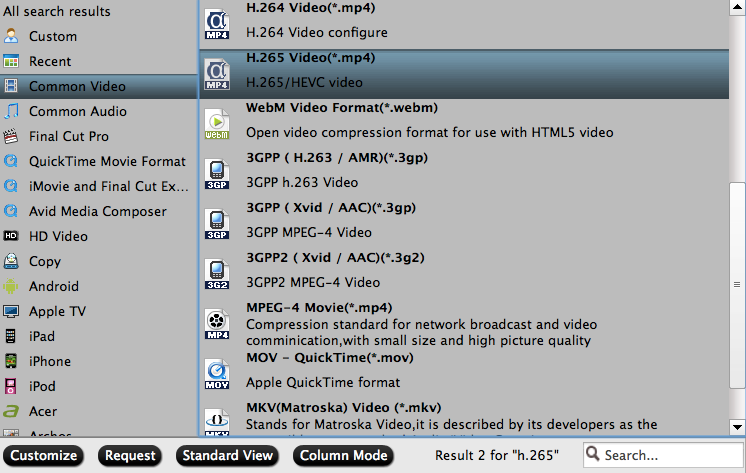
Clicking the Format bar drop-down list, the program supports to output 3 types of H.265 video.
Output H.265 MP4 video

Output H.265 HD MKV video

Output H.265 HD MP4 video

Tips: Click “Settings” on the main interface to open “Profile Settings” window, here, you can flexibly choose or specify exactly the parameters including video codec, resolution, bit rate, frame rate, audio codec, bit rate, sample rate, channels, etc as you like to get better output video and audio quality.
Step 3: Begin the conversion process.
After all setting is completed, hit the “Convert” button at the right bottom of the main interface to begin the encoding process from Blu-ray/DVD/video to H.265 on macOS Sierra.
When the conversion is completed, click “Open Output Folder” icon on the main interface to open the folder with generated files. Then feel free to play the generated files on your Mac computer with VLC or stream to 4K TV via Nvidia Shield TV, Roku 4 or Amazon Fire TV 2.


