Edit 4K Video with Windows Movie Maker
Category : 4K Formats , Windows Movie Maker
Nowadays, more or more PC available professional video editor software such as Sony Vegas Pro 13, Sony Movie Studio Platinum Platinum, Cyberlink PowerDirector 14 Ultimate, Corel VideoStudio Pro X7, etc has the ability to process 4K video editing. For PC users who have shot some 4K video with your phone or tablet and wish to find a free yet pretty simple to use video editor software to do some basic editing work, Windows Movie Maker can be the best choice for you. How about editing 4K video with Windows Movie Maker?
Minimum requirements to edit 4K video on PC with WMM
Users on dpreview forum confirms that as long as your PC is powerful enough is process 4K video, thatn you can comfortably work 4K video with Windows Movie Maker and then render 1080p output. Therefore, before importing 4K video to Windows Movie Maker, make sure that your PC computer meet the minimum requirements listed below to edit 4K video.
Integrated Graphics solutions that support 4K external displays (8GB RAM recommended with integrated graphics solutions):
– 4th generation Intel® Core™ processor family (Intel Haswell based CPUs) – (Intel® Iris™ Pro Graphics 5200 / Intel® Iris™ Graphics 5100, Intel® HD Graphics 5000 / 4600 / 4400 / 4200)
– AMD A10-7800 APU
Discrete Graphics cards that support 4K external displays:
Nvidia GeForce
– GeForce® GTX™ 970
– GeForce® GTX™ 980
– GeForce® GTX™ TITAN Z
– GeForce® GTX™ TITAN Black
– GeForce® GTX™ TITAN
– GeForce® GTX™ 780 & 780 Ti
– GeForce® GTX™ 770
– GeForce® GTX™ 760 & 760 Ti
– GeForce® GTX™ 750 & 750 Ti
– GeForce® GTX™ 690, 680, 670, 660, 660 Ti, 650, 650 Ti BOOST, 650 Ti
– AMD Radeon™ HD 7000 Series or better
Convert and compress 4K for Windows Movie Maker
Sometimes, even if your computer meet the minimum requirements to edit 4K video, you may still find that 4K video playbacks very choppy, this is due to the immense power required to play 4K video. In addition, Windows Movie Maker can only handle very limited 4K file formats including 4K AVI/WMV/MP4/MOV, if you try to load other incompatible 4K video such as 4K container formats like 4K MKV/MXF/TS/XAVC/XAVC S or 4K codec like 4K MPEG-4 AVC/H.264, 4K H.265 or 4K Prores, then Windows Movie Maker will not open those 4K video.
Related article: 4K XAVC S to Windows Movie Maker | 4K MXF to Windows Movie Maker
To fix Windows Movie Maker 4K video editing issue, you can download a third-party video conversion app such as Pavtube Video Converter to convert 4K video to Windows Movie Maker best editable WMV file format. To get a smooth editing experience, it would be much ideal for you to compress 4K to 1080p.
Edit 4K video with built-in editing options
Besides compressing and transcoding 4K video for Windows Movie Maker, the program can also act as a simple 4K video editing tool to assist you to complete some basic video editing work. You can trim or cut 4k video to remove unwanted parts or segments, merge separate video clips into one file(Windows Movie Maker only enables you to combine contiguous clips
), split large files into small parts by file size, length(Windows Movie Maker only allows you to split a large video into two small items) or count, crop the black bars around the video frame, add video/image/transparent text watermark to video, apply special rendering effects to video, etc.
Step by Step to Convert and Compress 4K Video to Windows Movie Maker
Step 1. Import 4k files to the program.
Run the program on your computer and click “File” > “Add Video/Audio” or “Add from Folder” to add 4K files to the program.

Step 2: Choose Windows Movie Maker supported file formats.
Click “Format” bar, from its drop-down list, navigate to the “Common Video” main category, from its extended list, select Windows Movie Maker best compatible “WMV HD(*.wmv)” under “HD Video” main category. Click “Settings” on the main interface to open “Profile Settings” window, from “Size(pix)” drop-down list, select “1980*1020” or “1080*720” to compress 4K to 1080p.

Step 3: Edit video(optional).
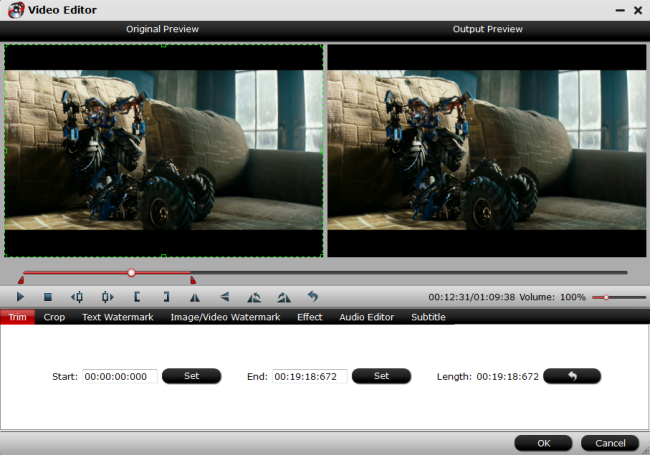
Check an item to active the “Video Editor” function, then click the pencil like icon on the top tool bar to open the “Video Editor” window, you can trim video length, crop video black bars, add watermark, apply special rendering effect, remove/replace audio in video, etc.

Step 4: Start the conversion.
Once the conversion is finished, you can click “Open Output Folder” button to get the output files effortlessly, and now you are ready to import and edit any files with Windows Movie Maker. Just import the converted files to Windows Movie Maker for editing via its “Import video” option.


