

Backup 3D/HD Blu-ray to Central DLNA for Streaming
Category : Hot Topics
With DLNA (DIGITAL LIVING NETWORK ALLIANCE), it’s now easy to stream music, video and other media around the house without any hassle. Have large collection of 3D Blu-ray or HD Blu-ray disc stored on your room shelf and wish to access the Blu-ray movies on your central DLNA server certified devices such as 3D/HD TV, PC, tablets, smartphones, and game consoles over your home network. The following article will show you how to make that achieved.
Rip 3D/HD Blu-ray to MP4 for DLNA Certified devices
Obviously, you can’t directly stream 3D/HD Blu-ray disc via Central DLNA server. You will first need to rip and copy the 3D Blu-ray/HD to digital file formats. As for the specific digital file formats, it all depends on which DLNA certified devices that you plan to stream the Blu-ray movies to. Here, you can get the job easily completed with our powerful yet simple to use Blu-ray Ripper software – Pavtube ByteCopy, which allows you to comprehensively rip Blu-ray disc/BDMV folder/ISO image file to DLNA certified devices like Smartphone, tablets, game consoles, TVs, etc best compatible digital file formats such as MP4, MKV, etc. Besides that, you can also choose to directly generate specific devices or programs preset profile formats with the optimal playback settings. For those people who wish to keep the multiple audio tracks and subtitles in original Blu-ray disc, you can use the program to output a lossless multi-track MKV format.
For those people who wish to stream 3D Blu-ray to view on DNLA certified 3D TV, you can also get help with this remarkable 3D Blu-ray Ripper/Copier to rip 3D Blu-ray to 3D TV playable 3D AVI/WMV/MP4/MOV/MKV with Side by Side/Top and Bottom/Anaglyph mode. Besides that, you can use built-in 3D profile settings function to adjust 3D video depth to get better 3D visual effect or switch left right image to change the image display order when viewing Side by Side 3D movies.
For your convenience, Pavtube ByteCopy is available on both Windows and Mac platform (get Mac version). In addition, the program also keeps constant update with perfect support for the new Windows 10 and macOS Sierra and also the powerful capability to bypass the new Blu-ray disc encryption used on recently released Blu-ray disc. In addition, the program helps to produce high-quality conversions, the quality of the converted video is identical to the picture and sound on the original 3D/HD Blu-ray disc.


Step by Step to Rip/Convert 3D/HD Blu-ray for DLNA Certified Devices Streaming
Step 1: Load 3D or HD Blu-ray disc.
Insert the 3D or HD Blu-ray disc into your computer’s Blu-ray drive. If your computer doesn’t ship with a drive, you will need to purchase an external USB Blu-ray drive to read on the data on Blu-ray disc. Then press “File” > “Load from disc” option on the main interface, alternatively, you can also import 3D/HD Blu-ray folder or 3D/HD Blu-ray ISO files with the program.

Step 2: Define the output format.
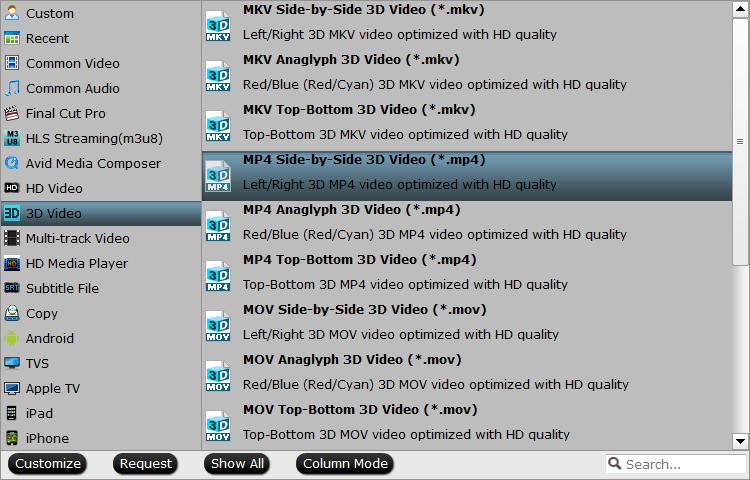
Clicking the Format bar, from its drop-down list, select DLNA certified devices best compatible digital file formats by following “H.264 HD Video(*.mp4)” under “HD Video” main category.

If you wish to stream 3D Blu-ray or Blu-ray to DLNA Certified 3D TV, you can choose to output one of 3D TV compatible file formats such as “MP4 Side-by-Side 3D Video(*.mp4)” from “3D Video main category.
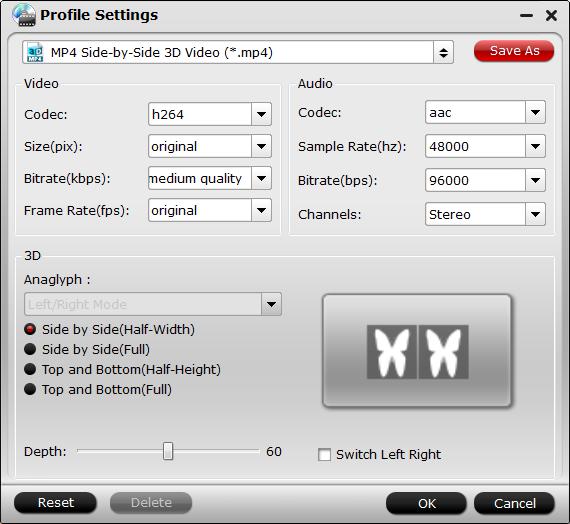
Adjust output 3D profile settings
Click “Settings” to open “Profile Settings” window, here you can adjust the 3D depth, change image display order for 3D SBS movie, you can also make a choice between full sbs and half sbs according to your own needs.
Step 4: Begin the Blu-ray ripping process.
After all setting is completed, hit the “Convert” button at the right bottom of the main interface to begin the conversion process from 3D/HD Blu-ray to DLNA certified devices compatible format.
When the conversion is finished, click “Open Output Folder” icon on the main interface to open the folder with generated files.
Then you can follow the tips below to stream your favorite high definition movies to any DLNA certified smartphones, tablets, game consoles, TVs or TV boxes, etc.
Turn Your Computer Into a DLNA Media Server
1. Launch Windows Media Player on your PC
2. Go to Stream (ensure that Allow remote control of my Player…is CHECKED > More streaming options (check Allowed on the Media programs on this PC and remote connection, or even better Allow All)
3. Follow the instruction on the screen until you get to Finish
4. Go to the PC’s Control Panel > System > Advanced System Settings > Remote (ensure to check Allow remote connections to this computer)
5. Relaunch Windows Media Player (and then proceed with the rest of the steps on your mobile device)
6. Access your video file and then playback the file to the connected PC (through an icon above your screen or Settings)Note: The name of the options in your PC might varies according to the version of Windows that you have installed.
Additional Tips: Click Settings button to adjust video/audio parameters. As for DLNA streaming, select a proper bitrate and resolution based on your WLAN bandwidth.


