

Work 4K Video with Sony Vegas Pro
Category : 4K Formats , Sony Vegas
Although Sony Vegas Pro has included support for 4K resolution video editing since the version 9.0, however, a lot of people still complain that they fail to get a smooth editing workflow of 4K video with Sony Vegas Pro and often suffer video stuttering or jerk issues.
“Hi guy’s. I have a major problem using Vegas Pro 13 with 4k footage. I got a Yuneec typhoon H drone which shoots 4k video on 30fps. When im making a compilation in Vegas Pro 13 and render the file there comes the problem. When i watch the finished movie i see to much stuttering footage.”
“Got GH4 footage to the timeline, but no smooth playback even at preview quarter. Jerky and impossible to edit. Need to down rez to 1080? Convert? Use proxy. Used Cine D style. Anybody solved this one?”
Minimum requirements to edit 4K video on Vegas Pro
From Vegas Pro’s official page, we get the information that to get optimal performance of 4K video on Vegas Pro, make sure that you computer meet the following minimum system requirements:
– Operating system: Microsoft Windows 7 (64-bit), Windows 8 (64-bit) or Windows 10 (64-bit)
– Processor: 2 GHz (8 cores recommended for 4K)
– RAM: 16GB RAM recommended for 4K)
– Hard drive space: Solid-state disk (SSD) or high-speed multi-disk RAID for 4K media
– Supported NVIDIA®, AMD/ATI® or Intel® GPU (1GB of memory recommended for 4K and GPU-accelerated video processing)
If your Windows computer doesn’t meet the standards listed above, you will only find your video skips and jumps and making it virtually impossible to edit with any real finesse.
When in that condition, it would be much ideal for you to create Proxy Video in smaller file resolution for smooth post editing workflow by following the steps below:
1. Capture or import your 4K clips.
2. Start a new project.
3. Add your 4K clips to the Project Media window.
4. Right-click the clips in the Project Media window and choose Create Video Proxy from the shortcut menu.
Vegas Pro creates video proxy files (.sfvp0) alongside the original files in Windows Explorer. You will not see these files in the Project Media window or Vegas Pro Explorer.
5. Add your 4K clips to the timeline and edit your project as usual.
The Preview Quality setting in the Video Preview window determines whether the proxy files or original files are used for editing and preview:
– When the preview quality is set to Draft or Preview, the proxy file is used.
– When the preview quality is set to Good or Best, the original file is used.
Alternatively, you can also choose to compress 4K to 1080p, which will also ensure you a smooth editing workflow on underpowered computer.
Related article: Import iPhone 7 4K to Vegas Pro | Canon 5D Mark IV 4K to Vegas Pro | Phantom 4 4K to Vegas Pro
Edit unsupported 4K video on Sony Vegas Pro
Sometimes, even if your computer are powerful enough to support smooth 4K video editing workflow, you may still fail to import certain 4K video into it due to the incompatible codec issue. Different Vegas Pro version has different format compatibility, the newest Vegas Pro 15 has full support for various 4K codec such as 4K HEVC/H.265, 4K Prores, 4K H.264, however, you will fail to load 4K Prores or 4K H.265 codec into previous version of Vegas Pro such as Vegas Pro 14/13/12/10/9.
To fix the codec incompatible issue, you can download Pavtube Video Converter, which has full support for all 4K video encoded with the compression of 4K H.264/H.265/Prores/MJPEG, etc or wrapped with the container formats of 4K AVI/WMV/MP4/MOV/MKV/TS/MXF/XAVC/XAVC S, etc. Thanks to the batch conversion mode, you can load multiple 4K video at one time for conversion. With the program, you can easily convert unsupported 4K video to Sony Vegas Pro different versions handle 4K file formats based on the specification page.
Besides converting 4K video for Vegas Pro, you can also choose to use the program to downscale 4K to 1080p if your computer is not powerful enough to handle 4K resolution video.


Step by Step to Convert and Compress 4K Video for Vegas Pro Editing
Step 1: Load 4K video into the program.
Open the program, click “File” menu, from its drop-down option, select “Add Video/Audio” to load 4K video to the program.

Step 2: Choose output file format.
If you own a powerful computer, you can directly output Vegas Pro handle 4K file formats such as “H.264 High Profile Video(*.mp4)” under “Common Video” main category.

If your computer is old or slow, just try to reduce 4K to 1080p by producing Vegas Pro compatible “H.264 HD Video(*.mp4)” under “HD Video” main category.

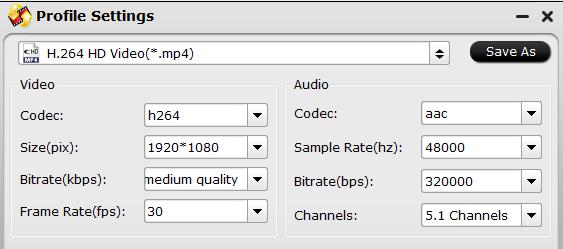
Step 3: Compress 4K to 1080p.
Click “Settings” to open “Profile Settings” window, from “Size(pix)” drop-down list, select “1980*1020” or “1080*720” to produce a file with smaller file resolution for smooth editing workflow with Vegas Pro.
Step 4: Start the conversion process.
After all settings are done, click right-bottom “Convert” button to begin to convert and compress 4K video to Sony Vegas Pro compatible editing codec or resolution.
When the conversion is completed, you will have no problem to import 4K video to Sony Vegas Pro for smooth post video editing workflow.


