

Store 4K Videos/Movies on Cloud Storage
Category : Storage/Server
The great benefits such as costs saving, scalability, data protection and proximity to end users of Cloud storage devices make such services an attractive solution to the data storage challenges faced by today’s businesses and public institutions. Have some personal 4K video downloaded from YouTube or shot with your 4K devices recorders and wish to store them on Cloud storage such as Dropbox, Google Drive, Amazon Cloud Drive, SugarSync, etc. The following article will show you how to better storage more 4K video on Cloud storage.
Can Cloud storage store 4K video?
Generally, all cloud storage has no specific formats requirement for the digital video storing on it. However, it is vell know that 4K video is significantly larger than 1080p and as a result requires a lot of more storage space. While a single minute 1080p footage at the standard 30 frames per second requires only 130 MB, a 4K video at the same framerate will require a whopping 375 MB.
Among the popular Cloud storage services, only Dropbox offers 2GB free storage while Google Drive offers free 15GB storage space. One hour of a 4K video or movie will go far beyond that limitation. More storage spaces means more cost. In addition, 4K file access on Cloud storage requires large amounts of Network bandwidth than 1080p video. Therefore, if you wish to save more cost and bandwidth, it would be much ideal for you to compress 4K to 1080p for Cloud storage saving.
Best tool to Compress 4K video for Cloud Storage
It won’t be difficult for you to downscale 4K video for Cloud storage with the video compressor program on the market. However, for those people who care much about compression speed and output compression quality, you can’t miss Pavtube Video Converter. The program has full support for various 4K video with different container file formats such as 4K AVI/WMV/MP4/MOV/MKV/MXF/XAVC/XAVC S and compression codec like H.264, H.265 or Prores. Thanks to its batch conversion mode, you can load multiple 4K video at one time for compressing for Cloud storage.
To compress 4K video to 1080p or 720p, you can choose to output the 4K video to an HD file format, then click “Settings” on the main interface to open “Profile Settings” window, from “Size(pix)” drop-down list, select “1920*1080” or “1080*720”. And this method is the best efficient solution to shrink 4K video file size. Besides changing the output file resolution, the program also offer other solutions listed below for you to compress 4K video:
– Lowering the bit rate will bring about the decrease of the video file size. But please keep in mind the image quality will be bad in case you make the bit rate too low.
Tips: For SD video, use a bit rate between 2,000-5,000 kbps. 720p video should have a bit rate between 5,000-10,000 kbps. 1080p video should have a bit rate of 10,000-20,000 kbps.
-Lower video frame rate: Encode your video in the same frame rate that you recorded it in. If you recorded above 30 frames per second, encode in half that (for example, a 60 FPS video would be encoded at 30 FPS)
Related article: Store 4K on Synology DS216 Play | Save HD Video to Cloud Storage | Store DVD onto Cloud Storage
Above listed 3 solutions will cause certain quality loss to original 4K video file format, if you don’t want to suffer any quality loss, you can use the following 3 methods offered by the program:
– Trim video length: Cut to remove unwanted segments from a video to leave only your unwanted specific portion
– Crop video file size: Remove the black edges or unwanted size area from the video
– Split video into parts: Split your 4K video file into various smaller parts by file size, count or length.
For Mac users, please swtich to download Pavtube Video Converter for Mac to shrink 4K video for Cloud storage saving on macOS Sierra or its previous version.


Step by Step to Compress 4K Video for Cloud Storage Better Saving
Step 1: Load 4K video.
Download the free trial version of the program. Launch it on your computer. Click “File” menu and select “Add Video/Audio” or click the “Add Video” button on the top tool bar to import source 4K video files into the program.

Step 2: Compress 4K video to 1080p.
Clicking the Format bar, from its drop-down list, select one of your desired HD file format such as “H.264 HD Video(*.mp4)” under “HD Video” main category.

Then click “Settings” on the main interface to open “Profile Settings” window, from “Size(pix)” drop-down list, select “1920*1080” or “1080*720”. You can also choose to lower video bit rate or frame rate to reduce 4K video file size according to your own needs.

Step 4: Trim/Crop/Split 4K files.
Trim 4K video file length
In the video editor window, choose the “Trim” tab and this tab is selected by default when the editing window appears. You can use the trim function to cut off unwanted parts from start and end. You can either drag pointers on the process bar or set exact time point in Start and End boxes to set.
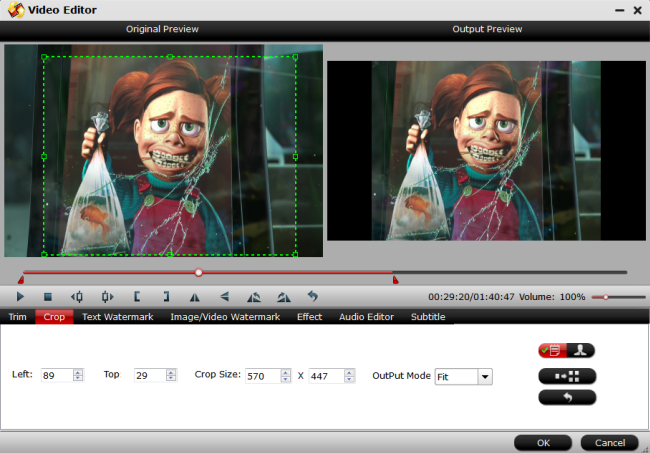
Crop 4K file file size
The “Crop” facility enables users to get rid of the black edges and unwanted area of the image. In the video editor window, navigate to the “Crop” tab. Follow the below methods to crop selected video:
A: Crop video by dragging and dropping the crop frame. Simply move your mouse cursor to drag and adjust the green frame to desired position.
B: Crop video by setting values. There are “Simple Mode” and “Advanced Mode” under Crop feature.
In “Simple Mode”, you can customize values in the box of “Left”, “Top” and “Crop Size” to make your crop decision. Under “Advanced Mode”, there are four value fields: Left, Top, Width and Height. You can either type in specific values to the fields or adjust sliders to crop the source file.
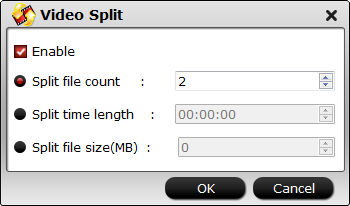
Split 4K file into smaller parts
Click the split button on the file list to launch the Video Split window. Ticking “Enable” option, you can split the file by file count, time length, or file size.
Step 5: Start 4K file compression process.
Specify an output folder on your computer for storing the converted files. Then hit right-bottom “Convert” button to start 4K file compression for Cloud storage process on your computer.
When the conversion is completed, you will get a small 1080p or 720p file size for better saving on Cloud storage with less storage cost and less bandwidth requirements.


