

Edit Blackmagic 4K Raw with Premiere Pro CC/CS6
Category : Adobe Premiere
The Blackmagic Design Production camera supports to record compressed 12-bit CinemaDNG RAW at 4000×2160 resolution. Right now Adobe Premiere Pro CC are the top editing solutions that have native support for Blackmagic raw 4K CinemaDNG. It also means that you won’t have a smooth workflow of Blackmagic raw 4K with Premiere Pro CS6. In addition, as the raw 4K files produced by Blackmagic Design Production camera usually have much higher bitrates, requiring more storage and processing power. Editing raw 4K footage takes more horsepower and storage than compressed formats, therefore, if your computer is not powerful enough, the video will keep skipping or jumping in the timeline of Premiere Pro CC. The following article will show you the solution to edit Blackmagic raw 4K with Premiere Pro CS6 or work Blackmagic raw 4K with Premiere Pro CC on slow Mac computer.
Create Proxy files with Premiere Pro CC
If you happen to own the latest Premiere Pro CC, the good news is that you can still get a smooth workflow of 4K video with Premiere Pro CC on slow Mac computer since the latest Premiere Pro CC2015.3 now provides an incredibly powerful proxy workflow that makes editing of 4K media a breeze. You can follow the steps below to create Proxy files with Premiere Pro CC 2015.3 or later versions.
You can create proxies directly from items in the project panel. Choose Create Proxies from the project panel context menu to open the Create Proxies dialog. The menu item is enabled when one or more items in the panel are selected that can be proxied. Premiere Pro can create proxies for master clip project items if they have video, have no captions, and are not growing files. The media must also be online.

In the Create Proxies dialog you can choose one of several built-in presets to use when transcoding high-resolution originals to create proxies. You can also add presets created in Adobe Media Encoder by clicking the Add Ingest Preset button. You can also choose to create proxies in a “Proxies” directory next to the original media, or in a custom location.

If you allow the progress dialog box to complete, a proxy job is created in Adobe Media Encoder for each of the project items chosen that can be proxied, and an offline proxy is attached to each project item. You can monitor the progress of these jobs in the Premiere Pro Progress panel, or in Adobe Media Encoder.
While the jobs are processed, you can continue to work with the corresponding high-resolution project items in Premiere Pro. When the proxy jobs complete, Premiere Pro automatically switches to displaying the proxy video in the Timeline if Enable Proxies is enabled in the Media preferences panel.
Premiere Pro does not need to remain open while proxy jobs are processed in Adobe Media Encoder. If you quit Premiere Pro before all jobs are complete, any proxies created while Premiere Pro is not running are attached when Premiere Pro is launched and the document is reopened.
Original source:
https://helpx.adobe.com/premiere-pro/kb/ingest-proxy-workflow-premiere-pro-cc-2015.html
As we have claimed above, only the latest Premiere Pro CC2015.3 and its later version have the feature to create Proxy files, if you are using the previous version of Premiere Pro CS6, you can not even able to load the Blackmagic raw 4K CinemaDNG, not mention to create Proxy files with the program. Fortunately, you can easily fix this problem with a third-part application called Pavtube iMedia Converter for Mac (review). The program can do you a great favor convert Blackmagic raw 4K CinemaDNG to Premiere Pro CS6 best favorable intra-frame editing codec Apple Prores in various media types including Apple Prores 422, Apple Prores 422 HQ, Apple Prores 422 Proxy and Apple Prores 422 LT. If your Mac computer are powerful enough to handle multicam and high-resolution video and you are going to do many effects editing work with Premiere Pro CS6. If your Mac computer is old or slow, or you just want to do some rough editing, you can select to output “Apple Prores Proxy)(*.mov)”or “Apple Prores (LT)(*.mov)”format to save more space and bandwidth.
Edit Blackmagic raw 4K CinemaDNG
Before loading Blackmagic raw 4K CinemaDNG into Premiere Pro CS6, you can do some simple video customization work with your video footage. If you don’t want to convert the entire video footage, you can use the trimming tool to cut away unwanted segments from the video, if there are black edges around your video frame, you can use the cropping tool to remove them off. You can also add external srt/ass/ssa subtitle to video.


How to Blackmagic raw 4K CinemaDNG for Premiere Pro CS6 for Best Editing Workflow?
Step 1: Load Blackmagic raw 4K CinemaDNG into the program.
Open the program, click “File” menu, from its drop-down option, select “Add Video/Audio” to load Blackmagic raw 4K CinemaDNG to the program.
Step 2: Define the output format.
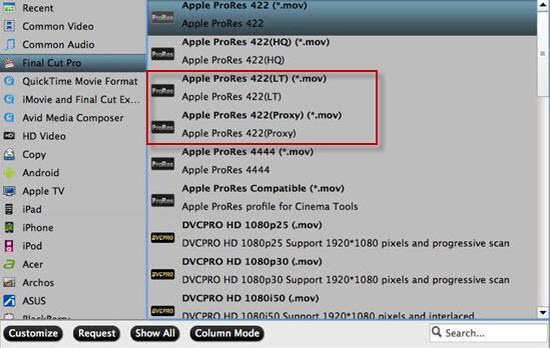
Clicking the Format bar, from its drop-down list, you can choose one of Premiere Pro CS6 best compatible Intra-frame editing format such as Apple Prores format. If your computer is powerful enough to handle 4K video, it would be ideal for you to choose “Apple Prores 422(*.mov)” or “”Apple Prores 422(HQ)(*.mov)” for high quality performance on Premiere Pro CS6.

If you have a underpowered computer, it is ideal for you to output “Apple Prores 422(Proxy)(*.mov)” or “Apple Prores 422(LT)(*.mov)” format for smooth editing workflow of 4K with Premiere Pro CS6.
Step 3: Trim/Crop/Add subtitle to Blackmagic raw 4K files.
Select an item on the main interface to activate the “Video Editor” function, in the opened “Video Editor” window, you can trim or cut off 4K video length, crop to remove black frame or insert external subtitle to it.

Step 5: Start the conversion process.
Go back to the main interface, hit right-bottom “Convert” button to start to convert Blackmagic raw 4K video to Premiere Pro CS6 best favorable Apple Prores editing formats.
When the conversion is completed, feel free to import video to Premiere Pro CC for professional post-production workflow of Blackmagic raw 4K with Premiere Pro CS6 on either powerful or slow computer.


