Edit 4K Video with VirtualDub
Category : 4K Formats
Have shot some 4K video with your 4K device recorders such as camera, camcorder or smartphone and wish to edit the 4K video in VirtualDub. The following article will talk about the workflow of 4K video with VirtualDub.
Can VirtualDub handle 4K resolution video?
The good news is that VirtualDub (64bit) supports 4K and 6K resolution video. However, the video editing process is not really users friendly. For one hand, 4K video editing has strict system requirements for your PC. For the other hand, the supported 4K video file formats by VirtualDub is limited to just AVI, you will fail to open other unsupported 4K formats with VirtualDub. Therefore, to get a smooth editing workflow of 4K video with VirtualDub, make sure the following the 2 principles listed above.
Minimum system requirements to edit 4K video
Integrated Graphics solutions that support 4K external displays (8GB RAM recommended with integrated graphics solutions):
– 4th generation Intel® Core™ processor family (Intel Haswell based CPUs) – (Intel® Iris™ Pro Graphics 5200 / Intel® Iris™ Graphics 5100, Intel® HD Graphics 5000 / 4600 / 4400 / 4200)
– AMD A10-7800 APU
Discrete Graphics cards that support 4K external displays:
Nvidia GeForce
– GeForce® GTX™ 970
– GeForce® GTX™ 980
– GeForce® GTX™ TITAN Z
– GeForce® GTX™ TITAN Black
– GeForce® GTX™ TITAN
– GeForce® GTX™ 780 & 780 Ti
– GeForce® GTX™ 770
– GeForce® GTX™ 760 & 760 Ti
– GeForce® GTX™ 750 & 750 Ti
– GeForce® GTX™ 690, 680, 670, 660, 660 Ti, 650, 650 Ti BOOST, 650 Ti
AMD Radeon™ HD 7000 Series or better
Convert unsupported 4K video for Virtualdub
Sometimes, even if your computer meet the minimum system requirements to edit 4K video, you may still fail to proceed due to the incompatible video file formats since VirtualDub can only handle 4K AVI file formats. To fix the format incompatible issue, you can download our best 4K Video Converter – Pavtube Video Converter. The program has full support for all 4K video wrapped with different container file formats such as 4K AVI/WMV/MP4/MOV/MKV/MXF/XAVC/XAVC S or encoded with the compression codec of 4K H.264, 4K H.265 and 4K Prores. The program supports batch conversion mode, so that you can load multiple 4K video into the application at one time for conversion.
With the program, you can easily produce VirtualDub supported 4K AVI editing formats with the codec of Divx, Xvid or DV. If your computer doesn’t meet the minimum system requirements to edit 4K video, you can also use the program to compress 4K to 1080p for smooth post editing workflow.
Edit 4K video with built-in editing options
Besides converting 4K video for VirtualDub, the program can also work as a simple 4K video editor to assist you to complete some simple 4K video editing work. You can trim the 4K video to cut off unwanted parts or segments, crop the 4K video to remove the black edges or unwanted size area, add video/image/transparent text watermark, deinterlaced interlaced 4K video into progressive form, apply special rendering effect, change output video picture effect, etc.
Step by Step to Convert and Compress 4K Video for VirtualDub Editing
Step 1: Load 4K video into the application.
Download the free trial version of the program. Launch it on your computer. Click “File” menu and select “Add Video/Audio” or click the “Add Video” button on the top tool bar to import source 4K video files into the program.

Step 2:Define the output format.
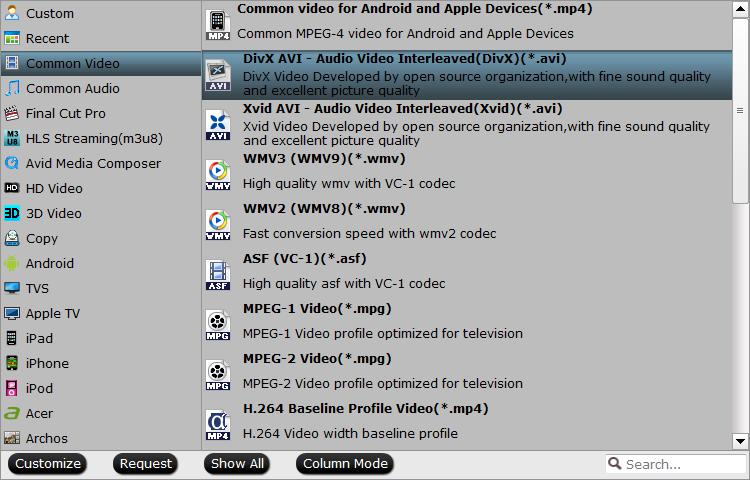
Clicking the Format bar, from its drop-down list, select virtualDub best compatible 4K file formats such as “Divx AVI – Audio Video Interleaved (Divx)(*.avi)” under “Common Video” main category. You can also choose “Xvid AVI” or “DV AVI” format according to your own needs.

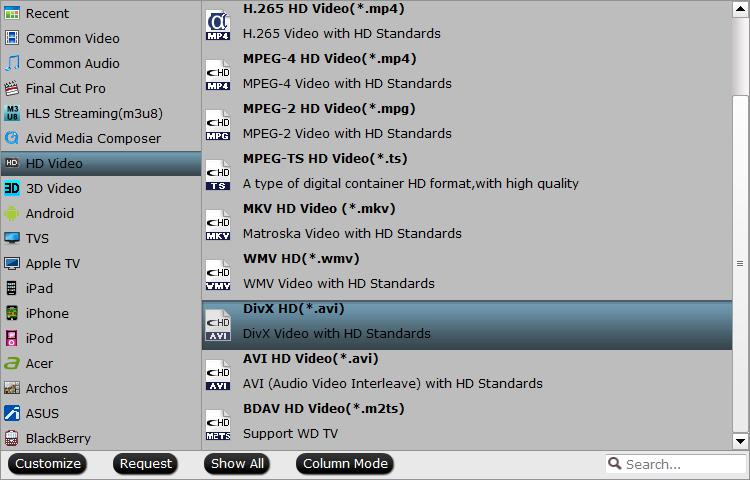
Tips: If your computer is not powerful enough to handle 4K resolution video, then you can choose to output VirtualDub supported “Divx HD(*.avi)” or “AVI HD Video(*.avi)” under “HD Video” main category.

Step 3: Edit 4K video with built-in editing tools.
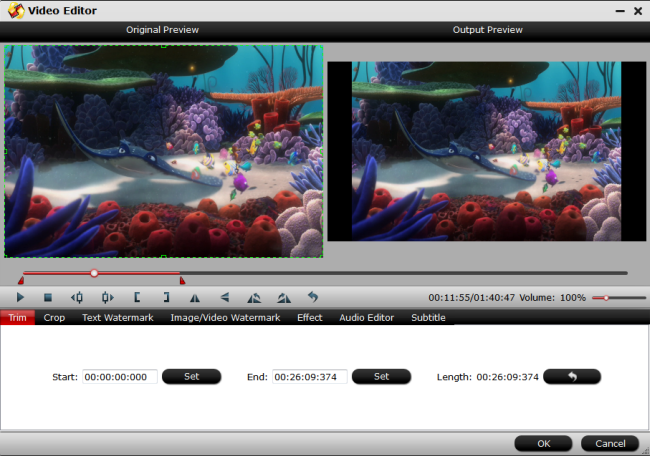
By default the Edit icon is grayed out. To activate the Edit menu, you have to select an item first. When a video or movie is selected, click the pencil like Edit icon on the left top tool bar to open the video editor window, here, you can play and preview the original video and output effects. Also you can, trim, crop, add watermark, apply special effect, deinterlaced video, etc.

Step 4: Begin the final conversion process.
After all setting is completed, hit the “Convert” button at the right bottom of the main interface to begin the conversion process from 4K video to VirtualDub converting and compression process.
When the conversion is finished, click “Open Output Folder” icon on the main interface to open the folder with generated files. Then you can get a smooth editing workflow of 4K video with VirtualDub.


