Compress DJI Mavic Air 4K Video to 1080p
Category : 4K Compressor
A marvel of engineering and design, the Mavic Air was built to go wherever adventure takes you. Inheriting the best of the Mavic series, this ultraportable and foldable drone features high-end flight performance and functionality for limitless exploration. The Mavic Air is the most portable DJI drone to house a 3-axis mechanical gimbal, with its angular vibration range reduced to 0.005°. Set in a triangular formation, gimbal dampeners help create even steadier shots. Best of all the Mavic Air shoots video at an incredible 4K 30 fps, recording at 100 Mbps to capture every second with UHD quality.
However, on the one side you can enjoy the 4K videos, on the other side is how can you make full usage of the 4K videos cause many deivces, media players, editing software will be choopy when playing the 4k videos. For example, have you ever met this issue that when you try to play and edit DJI Mavic Air 4k video on the old computer it’s hard to move on, or you have succeeded to output the 4k video but the file in a very large size. Or you want to upload the DJI Mavic Air 4k to Youtube, Facebook, Viemo but waste a lot of time becasue of the large file size. So today, I’m gonna show you the way to compress the DJI Mavic Air 4k to 1080p for smooth playback and edit.
Before we get to start it, one thing you have to prepare – a professional 4k video compressor. Pavtube Video Converter Ultimate for Windows/Mac (reivew) always stand out from its competitors which can easily compress 4k to 1080p without video quality loss. So that you can be free to upload the 4k footage to any community, including Youtube, Facebook, Twitter, Viemo and more. By the way, when you compress the resolution 4k to 1080p, you also reduce the video size. For those people who want to get a more smaller video size, you are lucky here, this software also grants you to change the video bit rate to downscale the video.
With this converter, you are able to edit DJI Mavic Air 4K footage before you output, such as you can merge several 4k footage parts into one, trim to cut the part you don’t need, crop the black area or the area you want to cut, remove or replace the audio of the source video, add external subtitle to the 4K footage, more thing you can do please refer to this article.
Step by Step to Compress DJI Mavic Air 4K to 1080p
Step 1: Load DJI Mavic Air 4K video into the program.
Start the program on your computer, click "File" menu and select "Add Video/Audio" or "Add from folder" to import DJI Mavic Air 4K video.

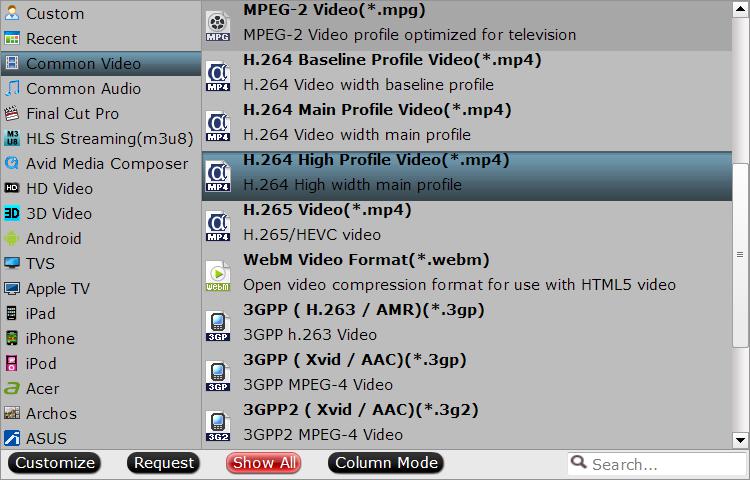
Step 2: Output H.264 HD video format
Click "Format" bar, from its drop-down options, choose the best compatible uploading format from "Common VIdeo" > "H.264 High Profile Video(*.mp4)".

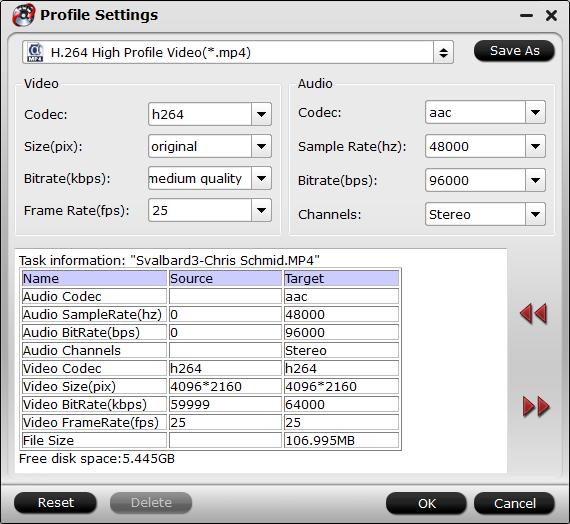
Step 3: Compress DJI Mavic Air 4K to 1080p
Hit "Settings" to open the "Profile Settings" window, here you can adjust the output video codec, resolution, bit rate, frame rate and audio codec, bit rate, sample rate and channels. To compress 4k to 1080p, just type 1920*1080 in Size blank. If you prefer smaller video size, lower the video bit rate can help you achieve this goal.

Step 5: Start the conversion.
Start to compress DJI Mavic Air 4K video to 1080p conversion by hitting the right bottom convert button, when the conversion is over, you will have no limitation to upload and share DJI Mavic Air 4K video on YouTube, or edit it with Adobe Premiere, After Effetcs with fast speed and perfect quality.


