

Edit DJI Phantom 4K with Davinci Resolve
Category : 4K Formats , DaVinci Resolve
Have shot some 4K video with your DJI Phantom 3, 4 or 4 Pro camera and wish to load them into Davinci Resolve for some professional post editing but the workflow of 4K video with Davinci Resolve may be very struggle especially when you don’t have a considerably powerful workstation. The following article will show you 2 workaround to get a smooth workflow of DJI Phantom 4K video with Davinci Resolve on a considerably not powerful workstation.
Solution 1: Create an optimized media with Davinci Resolve 12.5
Soluion 2: Compress DJI Phantom 4K to 1080p
Solution 1: Create an optimized media
Optimized media is a powerful feature that let Resolve users generate proxies out of the original footage, thus being able to play back any clip imported in the software smoothly and flawlessly. The fastest way to optimize your media inside DaVinci Resolve 12.5 is by selecting either a single clip or bunch of those and then by right-clicking you need to navigate to Generate Optimized Media.
The best part is that you can always go back to your original files. All you have to to do is head over to Playback in the top menu and disable Use optimized Media if Available. This is the fastest way to toggle between your original footage and the proxies you’ve created. By default, Resolve 12.5 will automatically switch to your high-quality media once you render the clips unless you enable this function manually. When using optimized media, you can also reveal an additional column in the Media Pool’s list view, which lets you see which clips have been optimized, and which clips haven’t.
Furthermore, if you want to get rid of your proxy files you can go to Playback and choose Delete Optimized Media. You can also set the type of the codec for your optimized media. Just access the main settings button placed in the bottom right corner of your screen, then go to General Options and choose the appropriate codec under the optimized Media tab. If you are a Windows user you can choose any of the available Avid DNx flavors, and if you are working on a Mac machine Apple ProRes should be the predominant choice for your workflow.
Original source:
http://www.4kshooters.net/2016/06/08/faster-editing-in-davinci-resolve-12-5-using-optimized-media/
Solution 2: Compress DJI Phantom 4K to 1080p
As we stated above, you can only create optimized media by using Davinci Resolve 12.5, for those people who are using the previous version of Davinci Resolve, you will be unable to use the method listed above. To fix this issue, you can choose to compress 4K to 1080p by using a third-party video conversion app. Here, we can get the job easily done with our best 4K Video Converter – Pavtube Video Converter. The program has perfect importing support for all the 4K video including 4K H.264 and 4K H.265 video shot with DJI Phantom 3, DJI Phantom 4 and DJI Phantom 4 Pro. You can easily compress DJI Phantom 4K to 1080p with smaller file resolution for smoothly playing and editing on Davinci Resolve supported editing formats in the program’s profile settings window.
For Mac users, please switch to download Pavtube Video Converter for Mac to downscale 4K to 1080p on macOS High Sierra, macOS Sierra, Mac OS X El Capitan, Mac OS X Yosemite, Mac OS X Mavericks.


Step by Step to Convert and Compress DJI Phantom 4K to 1080p for Davinci Resolve
Step 1: Load DJI Phantom 4K video.
Download the free trial version of the program. Launch it on your computer. Click “File” menu and select “Add Video/Audio” or click the “Add Video” button on the top tool bar to import DJI Phantom 4K video files into the program.

Step 2: Define the output format.
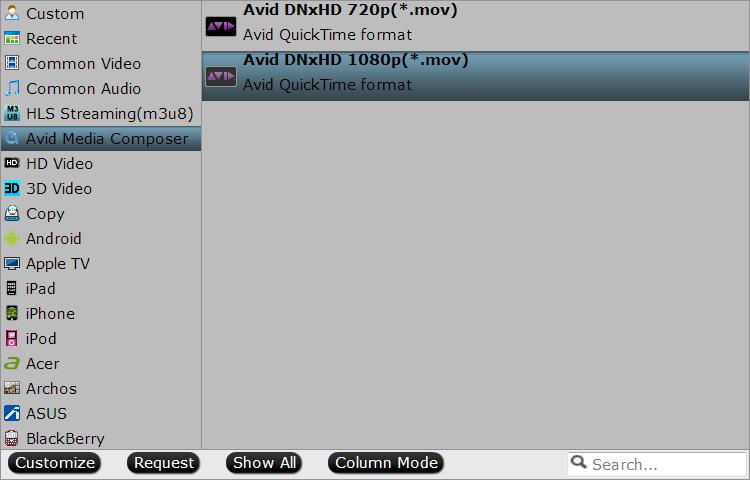
Clicking the Format bar, from its drop-down list, select Davinci Resolve supported editing formats such as “Avid DNxHD 1080p(*.mov)” under “Avid Media Composer” main category.
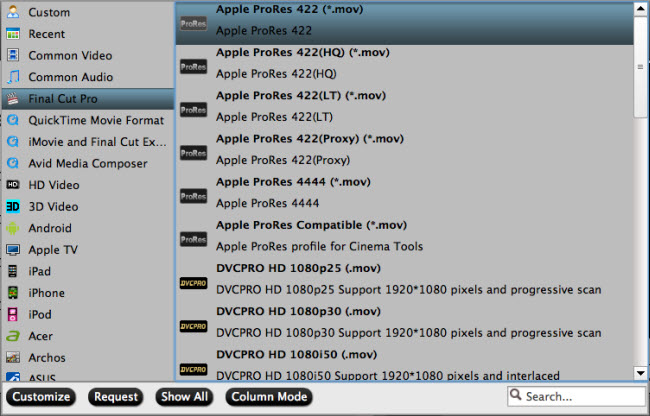
Tips: For Mac users, it would be much ideal for you to choose “Apple Prores 422(*.mov)” under “Final Cut Pro” main category.
Step 3: Compress 4K to 1080p.
Click “Settings” on the main interface to open “Profile Settings” window, from “Size(pix)” drop-down list, select “1980*1020” or “1020*720” to compress 4K to 1080p.
Step 4: Start the final conversion process.
After all setting is completed, hit the “Convert” button at the right bottom of the main interface to begin DJI Phantom 4K to Davinci Resolve supported 1080p conversion and compression process.
When the conversion is finished, click “Open Output Folder” icon on the main interface to open the folder with generated files.


