Category Archives: 4K Editor

Importing 4K XAVC footages from cameras to PowerDirector smoothly

Category : 4K Cameras , 4K Editor , XAVC

PowerDirector is a non-linear video editing software and it supports to import and output almost all popular video, audio and image formats. But when people trying to import 4K XAVC from some cameras like Sony Alpha a99 II 4K to PowerDirector for editing, it turns not that smooth. That’s because XAVC is the new codec which is not friendly with PowerDirector.

To open and edit all 4K XAVC files in PowerDirector(13/14) without hassle, a better choice is to convert 4K XAVC to Cyberlink PowerDirector most compatible format like MPEG-2. You can try this professional 4K XAVC to PowerDirector video converter which has helped many users solved the related issues.

Main Functions of Pavtube Video Converter

✔Convert all 4K XAVC and other PowerDirector not supported videoand audio to PowerDirector recognized formats.
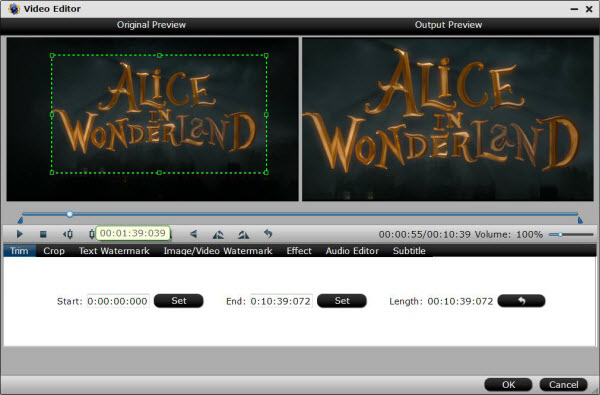
✔Besides converting functions PowerDirector can also edit all video formats in all aspects: rotate, split, merge, add titles, background music, effects, adjust frame rate, etc.
✔Convert between all almost video formats for uploading to YouTube or other popular video website or editing in FCP X, Avid Media Composer, Adobe Premiere Pro, Final Cut Express, Sony Vegas Movie Studio, Pinnacle Studio, etc.
✔User-friendly interface for beginners, casual users or hobbyists.
✔Compatible with Windows 10, Windows 8.1, Windows 8, Windows 7, Windows XP.

See also: 4K XAVC to MX player ǀ upscale 1080p to 4K ǀ 4K XAVC to Windows Movie Maker ǀ XAVC to YouTube/Google

Now don’t hesitate to download it and follow the step-by-step guide to transcode 4K XAVC videos for editing in PowerDirector smoothly. The program even has the advanced editing options to lets you fine-tune the final look of your movie. It also has its equivalent version for Mac users – Pavtube Video Converter for Mac to convert 4K XAVC to PowerDirector on Mac. It is compatible with macOS 10.12 Sierra, 10.11 El Capitan, 10.10 Yosemite, 10.9 Mavericks, 10.8 Mountain Lion, 10.7 Lion and 10.6 Snow Leopard.

Free download the 4K XAVC video converter for PowerDirector:

Other Download:
– Pavtube old official address: http://www.pavtube.com/video_converter/
– Cnet Download: http://download.cnet.com/Pavtube-Video-Converter/3000-2194_4-75734821.html
– Softonic Download: http://pavtube-video-converter.en.softonic.com/

How to Convert and Import 4K XAVC to PowerDirector

Step 1. Add 4K XAVC files

Install and run the best 4K XAVC to Adobe Premiere Pro Converter, and click the “Add File” button to load 4K XAVC video.

Step 2. Choose MPEG-2 format

Select output format. Click “Format” menu firstly and then follow “Adobe Premiere/Sony Vegas” > ” MPEG-2 (*.mpg)” as the output format. MPEG-4, WMV are also the proper choices.

Step 3. Start converting 4K XAVC to PowerDirector

Click “Convert” button to start converting 4K XAVC to MOV/MPEG-2/Apple Prores for PowerDirector program. Once the conversion is finished you can click “Open” button to get the output files effortlessly, and now you are ready to import and edit 4K XAVC files with PowerDirector. Just import the converted files to PowerDirector for editing by using the Media Browser or the Import command and do whatever you wanna do.


How to Convert and Compress 4K MXF for Windows Movie Maker Editing?

For Canon XC10 or Sony PXW-Z700 or other Camera or camcorder users, you will get 4K video footage wrapped in an MXF container file format. For Windows usersm when the shooting is done, you may wish to import the 4K MXF footage into its default video editing software – Windows Movie Maker for doing some simple video editing work. The following article will show you how to load 4K MXF into Windows Movie Maker.

4K MXF to Windows Movie Maker

Minimum system requirements to edit 4K with WMM

To edit 4K video with WMM, your PC should meet the following minimum system requirements:

To edit 4K video on PC with WMM, make sure that your PC meet the following minimum system requirements:
Integrated Graphics solutions that support 4K external displays (8GB RAM recommended with integrated graphics solutions):
– 4th generation Intel® Core™ processor family (Intel Haswell based CPUs) – (Intel® Iris™ Pro Graphics 5200 / Intel® Iris™ Graphics 5100, Intel® HD Graphics 5000 / 4600 / 4400 / 4200)
– AMD A10-7800 APU
Discrete Graphics cards that support 4K external displays:
Nvidia GeForce
GeForce® GTX™ 970
GeForce® GTX™ 980
GeForce® GTX™ TITAN Z
GeForce® GTX™ TITAN Black
GeForce® GTX™ TITAN
GeForce® GTX™ 780 & 780 Ti
GeForce® GTX™ 770
GeForce® GTX™ 760 & 760 Ti
GeForce® GTX™ 750 & 750 Ti
GeForce® GTX™ 690, 680, 670, 660, 660 Ti, 650, 650 Ti BOOST, 650 Ti
AMD Radeon™ HD 7000 Series or better

Can Windows Movie Make work with 4K MXF video?

Sometimes, even your computer has meet the minimum system requirements for editing 4K video, you may still fail to load 4K MXF video into Windows Movie Maker since MXF is not included in Windows Movie Maker supported editing formats. To fix this format incompatible issue, you can download a third-party video conversion app such as Pavtube Video Converter (best 4K video converter) to convert 4K MXF to Windows Movie Maker editable 4K AVI/WMV/MP4/MOV format. If your computer is not powerful enough to handle 4K video, it is ideal for you to compress 4K to 1080p for smooth video editing with Windows Movie Maker.

Edit 4K video with WMM alternative

Besides compressing and transcoding 4K MXF video for Windows Movie Maker, the program can also act as a simple 4K video editing tool to allow you do do some basic video editing work. You can trim or cut 4k video to remove unwanted parts or segments,merge separate video clips into one file(Windows Movie Maker only enables you to combine contiguous clips
), split large files into small parts by file size, length(Windows Movie Maker only allows you to split a large video into two small items) or count, crop the black bars around the video frame, add video/image/transparent text watermark to video, apply special rendering effects to video, etc.


How to Convert and Compress 4K MXF Video for Windows Movie Maker Editing?

Step 1. Import 4k MXF files to the program.

Run the program on your computer and click “File” > “Add Video/Audio” or “Add from Folder” to add 4K MXF files to the program.

Step 2: Choose Windows Movie Maker supported file formats.

Click the pull down menu of “Format”, then you will be able to select a Windows Movie Maker supported format from the output format profile, choose “HD Video”>”WMV HD (*.wmv)” as your output format for editing HD video on Windows Movie Maker.

<

Step 3: Edit video(optional).

Check an item to active the “Video Editor” function, then click the pencil like icon on the top tool bar to open the “Video Editor” window, you can trim video length, crop video black bars, add watermark, apply sepcial rendering effect, remove/replace audio in video, etc.

Step 4: Click “Convert” button to convert 4K MXF to WMM.
Once the conversion is finished, you can click “Open Output Folder” button to get the output files effortlessly, and now you are ready to import and edit any files with Windows Movie Maker. Just import the converted files to Windows Movie Maker for editing via its “Import video” option.


Load DJI Osmo 4K video to PowerDirector without any problems

Category : 4K Cameras , 4K Editor

CyberLink claims that PowerDirector 13 and PD 14 supports end-to-end editing of 4K Ultra HD video format with resolution up to 4096 x 2160. However, many popular 4K camera including DJI OSMO users have encountered varies problems during the editing process. So, how to import DJI OSMO 4K files to PowerDirector 13/14 for editing smoothly?


Well, according to our multiple testing, we found two main basic reasons behind there. DJI OSMO can record 4K video with MP4/MOV fomrat, which are not ideal editing-friendly format for PowerDirector due to the MP4/MOV’s complicated codec and the 4K high resolution. PowerDirector can handle (usually) 4K files without much problem, but it is extremely hardware intensive.

In this case, it is quite necessary to convert DJI OSMO 4K video to PowerDirector most compatible format like MPEG-2(1080P would be the best settings.), which will save you both time and trouble, and all you need is to drag the result videos from prommpt editing.

Different from 720p/1080p videos, the conversion of DJI OSMO 4K video is in a higher standard, a professional 4K Video Converter is what you need. Featured with the most advanced converting technology, Pavtube Video Converter is now providing the most reliable and professional 4K solutions to all DJI OSMO 4K format to PowerDirector issues by converting DJI OSMO 4K video to PowerDirector friendly format. (Mac version get Pavtube Video Converter for Mac)

*Hot search 1: DJI Osmo 4K videos
*Hot search 2: DJI Osmo 4K to Davinci Resolve
*Hot search 3: DJI Osmo 4K to Sony Vegas Pro
*Hot search 4: DJI Osmo 4K to Premiere Pro CC

Free download the DJI OSMO 4K to PowerDirector video converter:

Other Download:
– Pavtube old official address: http://www.pavtube.com/video_converter/
– Cnet Download: http://download.cnet.com/Pavtube-Video-Converter/3000-2194_4-75734821.html
– Softonic Download: http://pavtube-video-converter.en.softonic.com/

Simple Steps to Convert DJI OSMO 4K files for Editing in PowerDirector 13/14

Step 1: Launch the best DJI Osmo 4K to PowerDirector Converter and then click “Add Video” button to navigate your folder and then select the DJI Osmo 4K files you want to convert. You can also directly drag and drop your video files to the program. (Note: batch conversion is supported, so you can load more than one file to save time.)

Step 2: Choose output format for PowerDirector

Click on the Format box to get the dropdown menu. Select Adobe Premiere/Sony Vegas > MPEG-2 (*.mpg) as output format.

Step 3: DJI OSMO 4K Video Settings

Adjust video and audio parameters, including the Bitrate of Video and Audio, the Codec of Video and Audio, Video Size, Sample Rate, Frame Rate, Audio Channels, etc., in the Profile Settings. to get 4K files converted for working with Powerdirctor smoothly. You’d better adjust original 4K to 1080p.

Step 4: Start converting DJI OSMO 4K to PowerDirector

Click the Convert button to start transcoding DJI OSMO 4K files for Powerdirctor. After the process completes, click “Open” button to find the generated videos, and then you can import the DJI Osmo 4K video to Powerdirctor via its “Import Media Files” option easily and quickly.


GoPro Hero 5 4K to FCP X – Importing GoPro Hero 5 4K footages to FCP X

After you used GoPro Hero5 (GoPro HERO5 Black, GoPro HERO5 session) recorded some 4K videos, you may need to edit the footages with editing programs, like FCP X. Many users are talking about the GoPro Hero5 video editing issue on forums. The question is whether GoPro Hero5 recorded 4K MP4 files work well in FCP X. Due to the H.264 codec incompatibility and fps limits and 4K high resolution, a lot of users have found that they can’t import and edit GoPro Hero5 4K MP4 files with FCP X smoothly, so you can’t import GoPro Hero 5 4K MP4 to FCP X directly.

How can you import GoPro Hero5 recorded 4K MP4 files to work perfectly with the FCP X? What you need to do is to convert Hero5 4K MP4 files into Apple ProRes codec, this is the best codec for Final Cut Pro X. In market many programs can handle Hero 4 4K MP4 video files and transcode GoPro Hero5 to Apple ProRes codec for FCP X(read FCP X supported formats).

Solution for solving can’t edit GoPro Hero 5 4K footages with FCP X

If you have shot some 4K videos with GoPro Hero5 camera (Black or Session), and want to edit in FCP X, Pavtube HD Video Converter for Mac also features 4K video conversion, this program will transcode all the recorded files to FCP X native Apple ProRes codec. Besides, it can convert any GoPro Hero5 video to popular editing programs, such as Avid Media Composer, Premiere Pro CC, FCE, iMovie and more editing softwares. Also, the powerful FCP X video converter can convert any 4K or HD videos from GoPro all series or other camcorders or DVs (like JVC, Panasonic, Sony and Cannon) forediting in Final Cut Pro X or FCP 7/6 etc.

Other Download:

Step-by-step guide to convert GoPro Hero5 4K footage to Final Cut Pro X prores codec

Step 1: Download and install the GoPro to FCP X Converter on your Mac, and then click “Add Files” button to import your GoPro Herro5 4K to the software. If you wanna combine GoPro 4K MP4 files into one file, you can click the “Merge into one” box.

Step 2: Click the format bar, and move mouse cursor to “Final Cut Pro > Apple ProRes 422 (*.mov)” as output format.

Tips:

1. Edit GoPro videos(optional)

Far more than a Mac video conversion program, it provides some video editing functions: trim video into smaller segments; remove unwanted objects from video; brand your video by embedding a watermark; importing subtitle files in .srt or .sst format to video files.

2. Settings

You can click to set video resolution(1920×1080/1440×1080/1280×720/720×480), bitrate(from 1Mbps to 20Mbps), frame rate (24p/30p) or no changes according to your needs.

Step 3: After all the settings are OK, click the “Convert” button to start converting GoPro 4K MP4 to ProRes on Mac.

After the conversion, just click Open button to locate the output files. You can now use your converted GoPro videos in Final Cut Pro X with smooth editing.

Note: If you are also a FCP X user, before you try to do the conversion, don’t forget to make sure that you have installed the Apple ProRes Codec manually since the FCP X asks users to install it by themselves.


How to Work 4K videos in PowerDirector 13/14?

Category : 4K Editor , 4K Formats

Outline: If you are facing issues working with 4K files in PowerDirector 13/14, you may have interest in this post. It presents a workaround to transcode any 4K video to PowerDirector 14 supported file format, so that PowerDirector 13/14 can handle them smoothly.

CyberLink claims that PowerDirector 13 and PD 14 supports end-to-end editing of 4K Ultra HD video format with resolution up to 4096 x 2160. However, many PowerDirector 13/14 users have encountered varies problems during the editing process. So, how to import 4K files to PowerDirector 13/14 for editing smoothly?

Well, according to our multiple testing, we found two main basic reasons behind there. Nowadays, most 4K files are from 4K cameras (Canon EOS 1D C, Sony F5, F55, Sony FDR AX1, AX100, Sony A7s, Panasonic GH4) and more. The common 4K cameras use XAVC, XAVC S or H.264 as the compression codec, which are ideal editing friendly format for PowerDirector. And, PowerDirector can handle (usually) 4K files without much problem, but it is extremely hardware intensive.

If for whatever reason you are unable to work with 4K files in PowerDirector smoothly, we would recommend transcoding them to a format that is compatible with your editing program first. This requires a third 4K to PowerDirector video converter, and Pavtube Video Converter will do the trick well. With it, you change effortlessly convert 4K footage and SD/HD videos like 4K/AVI/MXF/MOV/H.265 etc to PowerDirector formats without quality loss. Then you will be able to import the new file into PowerDirector with smooth editing without any problems. 

What’s more, this powerful 4K video converter also can convert any 4K videos to other popular NLEs like FCP, Windows Movie Maker, Avid MC, Premiere Pro, Sony Vegas, etc formats for nice importing and editing. 

Free download the top 4K video converter for PowerDirector 13/14:


Other Download:
– Pavtube old official address: http://www.pavtube.com/video_converter/
– Cnet Download: http://download.cnet.com/Pavtube-Video-Converter/3000-2194_4-75734821.html
– Softonic Download: http://pavtube-video-converter.en.softonic.com/

How to Convert 4K videos to PowerDirector 13/14 quickly?

Step 1: Launch Pavtube Video Converter, then click the “Add video” button to load 4K files to the program from your computer. You can also directly drag the video files into the program directly. 


Step 2: Click “Format” menu firstly and then follow “Adobe Premiere/Sony Vegas” > ” MPEG-2 (*.mpg)” as the output format. MOV, WMV are also the proper choices.


Step 3: Lastly, simply click the “Convert” button at the bottom right corner to start encoding 4K to MPEG-2 for Cyberlink PowerDirector. Everything else will be automated. If you have added quite a bunch of video files, it would take some time to convert. In such case, you can click Option and tick the box “Shut down the computer after conversion”. 

After the conversion, click “Open” to locate the result videos and then you can import the converted files for editing Cyberlink PowerDirector via its “Import Media Files” option.


2016 Best 4K Video Editing Software for Windows and Mac

Category : 4K Editor , Hot Topics

It’s the first law of 4K movie-making or video-making: no matter how expensive your camera, or how skilled you are at using it, your raw footage will always be rubbish. And so, if you’re looking to add a little professional polish, then installing a video editor will be essential. Commercial video editors can be very expensive, of course, but you may not have to go that far. Whether you want to trim your clips down to size, add a soundtrack or captions, apply transitions or special effects, there are some great free 2016 4K video editing tools which can help – and these are the very best around. 

Pavtube Video Converter Ultimate

Pavtube Video Converter Ultimate is an easy-to-use and feature rich editing tool for Windows and Mac. You’d better to get a commercial video editing application. It is such a great video editor that helps you to edit all regular video formats to share with the worldwide.

Supported platforms: Mac (El Capitan included), Windows (Windows 10 supported)

  • Trim: You can use the “Trim” function to remove the unwanted segments by deciding where to start and where to end when converting the selected clip.
  • Crop: With the “Crop” function, you can remove the black edges around the image.
  • Effect: From effect drop-down option, you can select special effects like: Simple Gauss Blur, Flip Color, Invert, Aged Film to apply to your source video. In Color Control section, you can change color by adjusting brightness, contrast, saturation. You can also check “Deinterlacing” to keep good image quality.
  • Audio Editor: You can remove the original audio from video or replace the original video with another audio, you can also set audio fade in or fade out effects.
  • Subtitle: Check “Enable”, you can add *.srt or *.ass/*.ssa subtitle files to the video as hard subtitles.

More powerful features:

  • Compress a 200+GB 4K movie to MPEG-4, MP4, WMV and FLV that output smaller video size.
  • Scale 4K to 1080p full HD resolution to get smaller size and make it good at playing on mobiles, covering iPhone 6S, iPad Pro, iPad Mini 4, Samsung Galaxy Note 5/S6 edge, etc.
  • Upscale 1080p to 4K for other usages.


Cyberlink PowerDirector 14 Ultimate

This consumer-focused video editing software – PowerDirector now supports editing 4K Ultra HD, H.265/HEVC, AVCHD 3D/Progressive. So whether you’re producing a TV show in 4k or a simple YouTube 4k video, PowerDirector is the station where you will be satisfied. PowerDirector makes it easy to fix lighting and color and to stabilize your video. The stabilization tool gives you the ability to fix rotational camera shake. There’s also an enhanced-stabilization mode, which taxes your PC more. I am disappointed that the effect doesn’t let you know when it’s done, and preview playback occasionally halted, but the final result was excellent. The tool also lets you adjust the crop factor that stabilization introduces.The trim tool allows precise control (down to the individual frame) with two sliders, and the multi-trim tool lets you mark several In and Out points on your clip—a useful tool for cutting out the chaff.

Supported platforms: Microsoft Windows 8/8.1, 7, Vista (SP2)


Final Cut Pro X

Built to meet the needs of today’s creative editors, Final Cut Pro breaks free from the restrictions of old-fashioned timeline tracks. A dynamic editing interface lets you experiment freely while working with extraordinary speed and precision. This 4K video editing software supports a wide range of formats, say 3GP, AVI, MP4, MXF, QuickTime, etc. Now up to version 10.2.2, it is used by both professionals and amateurs, along with other filmemakers. The video editor supports 4k videos and movies, including the hot Jurassic World. 

With a visual simplicity that reveals powerful professional tools just when you need them, the Magnetic Timeline in Final Cut Pro offers an exceptionally fluid, flexible way to edit. Assemble shots with ease as clips “magnetically” close up to eliminate unwanted black gaps in the timeline. Similarly, clips move out of the way to avoid clip collisions and sync problems. If you prefer to work with traditional, non-rippling editing behaviors, you can use the Position tool to build your timeline. Interactive animations show you exactly what’s happening as you work, so you can easily try out new ideas. But not all Mac users can use the Mac video editor. Only users of Macbook Pro with Tunderbolt 2 and new Mac Pro can edit video in 4K resolution.


Above editing softwares are the best three 4k video editor softwares in 2016. Certainly, they’re not suitable for those budget conscious people because of their a bit higher price tags, but you’ll get what you’re paying for. High-end features and experiences are usually bound to high-end prices. Just choose your best one, enjoy.